Topics for v2.x
Topics for v1.x
Editor
The editor can be started by going to Start menu->Programs->Plane9->Scene editor.
You can reposition the windows in the editor by clicking and dragging either the windows tab or the title of the window. If you right click on the tab of the window you will also get a context menu.
A recommended setup if you have a multimonitor display is to drag the render window onto your second monitor.
 The scene window is the main editing area. In here you will see all the scenes nodes and the connections that exists between the nodes.
- Pan using middle mouse button or alt + left mouse button
- Drag nodes by left clicking on the node name (top of the node) and moving the mouse
- Right click on a port to bring up the context menu. Using it you can select a new node that should be added and connected to that port
- Right click on the connections between the node to bring up a context menu where you can delete the connection or insert a node where the connection is
All ports are color coded to help you identify what ports that can be connected to each other.
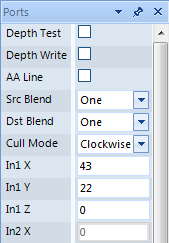 The ports windows shows the ports on the currently selected node in the scene window.
Select the value you want to change and enter a new value.
If the port is connected to another port in the scene window it will be dimmed since you can't change such a port directly. You need to remove the connection the port has to another node first.
The ports windows shows the ports on the currently selected node in the scene window.
Select the value you want to change and enter a new value.
If the port is connected to another port in the scene window it will be dimmed since you can't change such a port directly. You need to remove the connection the port has to another node first.
You can click and drag on a label to "scroll" the value. Hold down shift while doing so to decrease the scroll speed to 1/10. Hold down ctrl to increase the scroll speed by 10.
###! Special ports
Expression port In expression ports you can enter math expressions that should be evaluated.
Shader port These ports allows you to write custom Cg code. The shaders runs on the graphics card and allows you to directly change the vertices and rendered pixels. Standard library functions that exists in Cg can be found on Nvidias homepage
The shader is compiled in realtime so you dont need to press any key to compile it. This does allow for very fast trial and error experimentations to find just the right values or functions. However you should watch out when creating loops. For example if you create a complete loop like "while(1) " at any time you will hang your graphics card. When creating such code adding comments (/* */)around the code first then writing the code in the comment until its complete is one way to avoid such a problem.
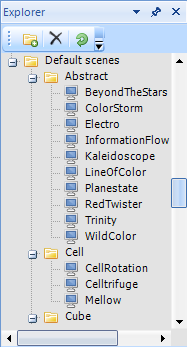 In this window you manage the scenes.
Using the buttons on the top of the window you can, from left to right,
Create a new sub folder, delete the currently selected scene and refresh the list from disk
In this window you manage the scenes.
Using the buttons on the top of the window you can, from left to right,
Create a new sub folder, delete the currently selected scene and refresh the list from disk
Note: The scenes that are under the branch called "Default scenes" shouldn't be changed since any changes made to them will be lost when you upgrade the program to the next version. Instead after you have edited such a scene save it as a new one
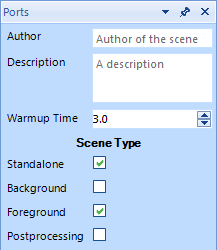 To show the scene properties click on any empty area in the scene window.
The ports window will change to show the scene properties.
In the scene type section you choose what type of scene this is.
If this scene looks good as both a standalone and a background scene you would check both those boxes.
To show the scene properties click on any empty area in the scene window.
The ports window will change to show the scene properties.
In the scene type section you choose what type of scene this is.
If this scene looks good as both a standalone and a background scene you would check both those boxes.
If you have created a nice scene and want to give it to someone else then first check so you have filled in the scene properties correctly.
- Select the scene in the explorer window in the editor.
- Click the "Export" button. Save the file in a location of your choice.
- Send the file to you friends The receiving party only needs to double click on the file to import it. They can the select it in the Plane9 Configuration as with the default scenes.
If you want to share the scene with the world then you can upload it to this site so others can easily get it and comment on it. It might even get included in the official Plane9 distribution!